Hexo添加hexo-theme-miho主题
原创💡 Abner Mai 2021-08-30 约 1617 字 大约 5 分钟
# Hexo添加hexo-theme-miho主题
上一篇文章:简单构建Hexo,教您如何搭建一个简单的Hexo Blog
# 主题
# 添加主题
本文使用 hexo-theme-miho 主题
- 这里的主题不是我们自己写的,而是从Hexo官网主题 (opens new window)clone过来的(开源)
- 复制该主题的 git 地址
- 打开程序 Git Bash Here ,进入博客目录下的themes目录下,clone git项目
cd themes进入主题目录git clone [gitAddr] [themes name]克隆 git 项目到本地。[themes name]如果不填写,则会创建一个名为项目名的目录
- 输入命令
ls查看是否 clone 成功
# 绑定主题
Hexo主目录下的"_config.yml"文件部分解释
		# Hexo Configuration
		## Docs: https://hexo.io/docs/configuration.html
		## Source: https://github.com/hexojs/hexo/

		# Site
		title: FlyingFish Blog  ##页面名称,标签栏显示
		subtitle:
		description:
		keywords:
		author: maiyikai ##作者
		language:
		timezone:

		# URL
		## If your site is put in a subdirectory, set url as 'http://yoursite.com/child' and root as '/child/'
		url: https://maiyikai.github.io/  ##默认的地址,后边会有一些地方用到,请改为自己的博客地址
		root: /
		permalink: :year/:month/:day/:title/
		permalink_defaults:

		# Directory
		source_dir: source
		public_dir: public
		tag_dir: tags
		archive_dir: archives
		category_dir: categories
		code_dir: downloads/code
		i18n_dir: :lang
		skip_render:

		# Writing
		new_post_name: :title.md # File name of new posts
		default_layout: post
		titlecase: false # Transform title into titlecase
		external_link: true # Open external links in new tab
		filename_case: 0
		render_drafts: false
		post_asset_folder: false
		relative_link: false
		future: true
		highlight:
		  enable: true
		  line_number: true
		  auto_detect: false
		  tab_replace:

		# Home page setting
		# path: Root path for your blogs index page. (default = '')
		# per_page: Posts displayed per page. (0 = disable pagination)
		# order_by: Posts order. (Order by date descending by default)
		index_generator:
		  path: ''
		  per_page: 10
		  order_by: -date

		# Category & Tag
		default_category: uncategorized
		category_map:
		tag_map:

		# Date / Time format
		## Hexo uses Moment.js to parse and display date
		## You can customize the date format as defined in
		## http://momentjs.com/docs/#/displaying/format/
		date_format: YYYY-MM-DD
		time_format: HH:mm:ss

		# Pagination
		## Set per_page to 0 to disable pagination
		per_page: 10
		pagination_dir: page

		# Extensions
		## Plugins: https://hexo.io/plugins/
		## Themes: https://hexo.io/themes/
		theme: miho  ##绑定主题,,在themes目录下的git主题的目录名称

		# Deployment
		## Docs: https://hexo.io/docs/deployment.html
		deploy:
		  type: git
		  repo: https://github.com/maiyikai/maiyikai.github.io.git
		  branch: master
1
2
3
4
5
6
7
8
9
10
11
12
13
14
15
16
17
18
19
20
21
22
23
24
25
26
27
28
29
30
31
32
33
34
35
36
37
38
39
40
41
42
43
44
45
46
47
48
49
50
51
52
53
54
55
56
57
58
59
60
61
62
63
64
65
66
67
68
69
70
71
72
73
74
75
76
77
78
79
80
81
82
83
84主题的个性化配置
		# hexo-theme-miho
		# https://github.com/wongminho/hexo-theme-miho

		# Favicon of your site | 网站icon
		favicon: /pen_logo.ico

		# Header

		# Keywords of your site | 网站关键字
		keywords: maiyikai,maiyude,FlyingFish blog
		# Head headline | 头部标题
		header_title: FlyingFish's Blog
		# Head description | 头部描述
		header_description: 随笔记
		# Link to your logo | logo地址
		logo: images/logo2.png
		# Link to your banner_img | 首页banner图地址
		banner_img: images/banner.jpg
		# Menu setting | 菜单设置
		#  name:                  Font Awesome icon | Font Awesome 图标
		#    title: Home          Title | 标题
		#    url: //minhow.com    Url, absolute or relative path | 链接,绝对或相对路径
		#    target: true         Whether to jump out | 是否跳出
		menu:
		  home:
		    title: Home
		    url: /
		    target: false
		  archive:
		    title: Archives
		    url: /archives
		    target: false
		  user:
		    title: About
		    url: /about
		    target: false
		# Social setting, use to display social information | 社交设置,用来展示社交信息
		#  name:                  Font Awesome icon | Font Awesome 图标
		#    title: Home          Icon title | 图标标题
		#    url: //minhow.com    Url, absolute or relative path | 链接,绝对或相对路径
		#    target: true         Whether to jump out | 是否跳出
		social:
		  home:
		    title: maiyikai
		    url: //maiyikai.github.io/
		    target: true
		  github:
		    title: Github
		    url: //github.com/maiyikai/maiyikai.github.io
		    target: true
		  weibo:
		    title: Weibo
		    url: //weibo.com/maiyikai
		    target: true
		#  twitter:
		#    title: Twitter
		#    url: //twitter.com/huangminhow
		#    target: true
		  #qq:
		  weixin:
		    title: Weixin
		    url: //maiyikai.github.io/images/user_weixin.jpg
		    target: true
		  #snapchat:
		  #telegram:
		  #envelope-o:
		  #facebook:
		  #google:
		  #linkedin:

		# Content

		# Excerpt length | 摘录长度
		excerpt_length: 190
		# Excerpt link | 摘录链接
		excerpt_link: more>>
		# New window open link | 新窗口打开文章
		open_new_link: false
		# Article default cover picture,size:350*150 | 文章默认封面图,尺寸:350*150
		cover_picture: //maiyikai.github.io/images/banner.jpg
		# Open background particles | 开启背景粒子
		open_bg_particle: true
		# Open animation in homepage and head | 开启主页及头部动画
		open_animation: true

		# Article

		# Open toc | 是否开启toc
		toc: true
		# Open share | 是否开启分享
		share: true

		# Style customization | 样式定制
		style:
		  # Main color tone | 主色调
		  main_color: '#0cc'

		# Reward | 打赏

		reward:
		  # 0-close, 1-All articles are rewarding, 2-Article's md file has reward:true attribute, only reward
		  # 0-关闭, 1-所有文章均有打赏, 2-文章的md文件里有reward:true属性,才有打赏
		  status: 1
		  # 标题
		  title: ~谢谢大爷~
		  # 微信,关闭设为 false
		  wechat: images/wechat_code.jpg
		  # 支付宝,关闭设为 false
		  alipay: images/alipay_code.jpg

		# Comments | 评论  建议不使用 gitment,,网站证书过期了,使用很麻烦

		# 畅言,输入appid和appkey
		changyan_appid: false
		changyan_appkey: false
		# 友言,输入id
		youyan_id: false
		# disqus
		disqus: false
		# gitment  https://github.com/imsun/gitment
		gitment:
		  owner: false   #你的 GitHub ID
		  repo: ''   #存储评论的 repo
		  client_id: '' #client ID
		  client_secret: ''  #client secret

		# Analytics | 分析
		# 站长分析,输入站点id
		cnzz_analytics: false
		# 百度分析,输入key值
		baidu_analytics: false
		# google analytics | google分析
		google_analytics: false

		# Footer

		# Access statistics | “不蒜子”访问量统计
		access_counter:
		  on: true
		  site_uv: 总访客数:
		  site_pv: 总访问量:

		# Copyright Information | 版权信息 ---不可更改,尊重他人的智力成果权
		copyright: 2018 MinHow
1
2
3
4
5
6
7
8
9
10
11
12
13
14
15
16
17
18
19
20
21
22
23
24
25
26
27
28
29
30
31
32
33
34
35
36
37
38
39
40
41
42
43
44
45
46
47
48
49
50
51
52
53
54
55
56
57
58
59
60
61
62
63
64
65
66
67
68
69
70
71
72
73
74
75
76
77
78
79
80
81
82
83
84
85
86
87
88
89
90
91
92
93
94
95
96
97
98
99
100
101
102
103
104
105
106
107
108
109
110
111
112
113
114
115
116
117
118
119
120
121
122
123
124
125
126
127
128
129
130
131
132
133
134
135
136
137
138
139
140
141
142
143
144
145
# 加入评论
因为加入gitment有很多的问题,让我浪费了很多的时间,所以我改为了 “畅言”
- 进入畅言官网 (opens new window),注册一个账号
- 拉倒下边,点击 “立即免费获取畅言”

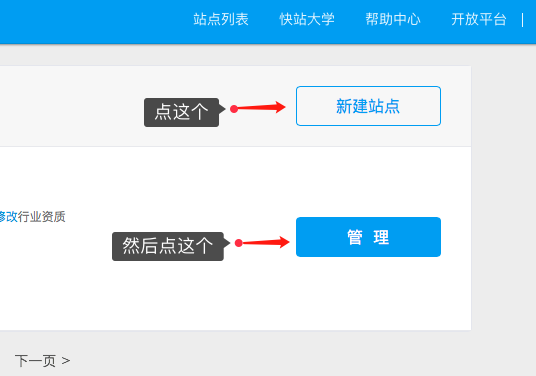
- 建站,随便点一个

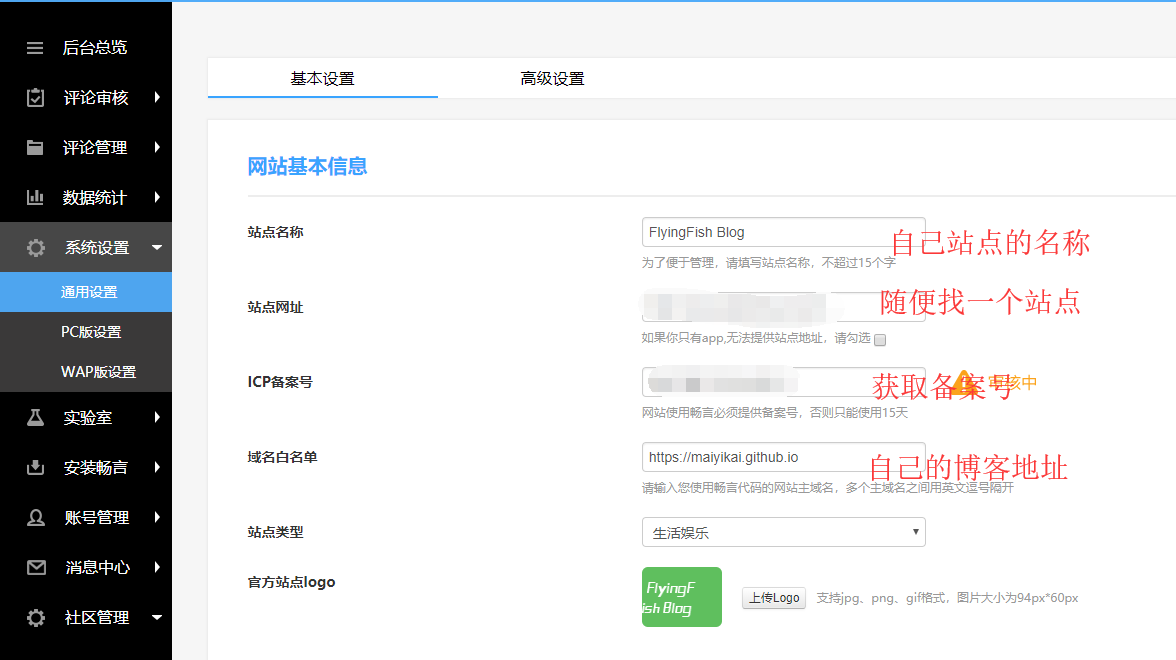
- 配置畅言的基本设置

- 网上随便找一个小网站
- 进入[备案号查询](http://icp.chinaz.com)
- 复制需要的信息即可
- 提交审核
- 静静等待
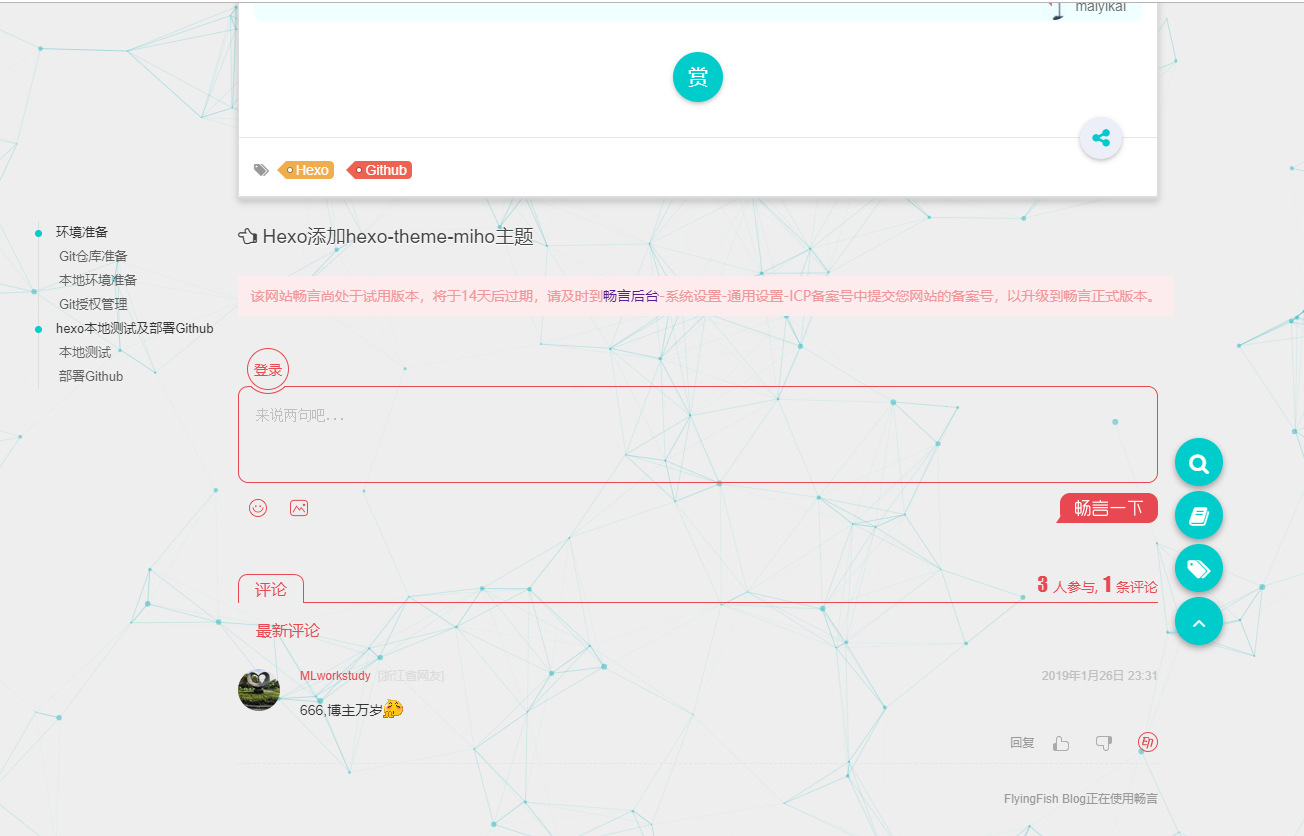
上线畅言评论功能(部署之后才能使用)
- 获取
appid和appkey在畅言后台管理页面-》后台总览,往下拉就可以看到了 - 在主题themes目录下,编辑"_config.yml"文件,找到评论配置区域,粘贴信息即可

- 获取
至此,在主题
hexo-theme-miho下,畅言就配置成功了
# 加入搜索
页面中有个搜索功能,需要一个文件的支持
- 进入hexo主目录下的source文件夹
- 在当前文件夹下创建一个文件,文件名固定
content.json - 写入文件内容,即搜索用的关键字(使用的时候把注解去掉)
	{
	    "meta":{
	        "title":"FlyingFish Blog", ##博客名
	        "subtitle":null,
	        "description":"FlyingFish Blog,",
	        "author":"maiyikai",
	        "url":"https://maiyikai.github.io/" ##博客地址
	    },
	    "pages":[

	    ],
	    "posts":[
	        {
	            "title":"简单构建Hexo", ##文章标题
	            "comments":true,
	            "path":"2019/01/26/1548499728/", ##文章路径,在博客地址下的路径
	            "text":"Windows Hexo 博客 github Git GitHub" #关键字,也可以是文章的全部文本
	        }
	    ]
	}
1
2
3
4
5
6
7
8
9
10
11
12
13
14
15
16
17
18
19
20
2
3
4
5
6
7
8
9
10
11
12
13
14
15
16
17
18
19
20
# 部署上线
- 依次输入命令:
- 输入命令
hexo clean清除缓存 - 输入命令
hexo g构建 - 输入命令
hexo d部署
- 输入命令
- 部署结束之后,可以使用您的地址访问了
- 效果应该是和本博客当前日期的版本是一致的

